Weather Widget for Hosted Builders: Step-by-Step Guide To Display a Live Weather
Are you looking for a weather widget for hosted builders? Maybe you’ve struggled with tools that look outdated or don’t match your design. Don’t worry, as this guide walks you through a more flexible and user-friendly solution - Weather365 widget! Discover now!
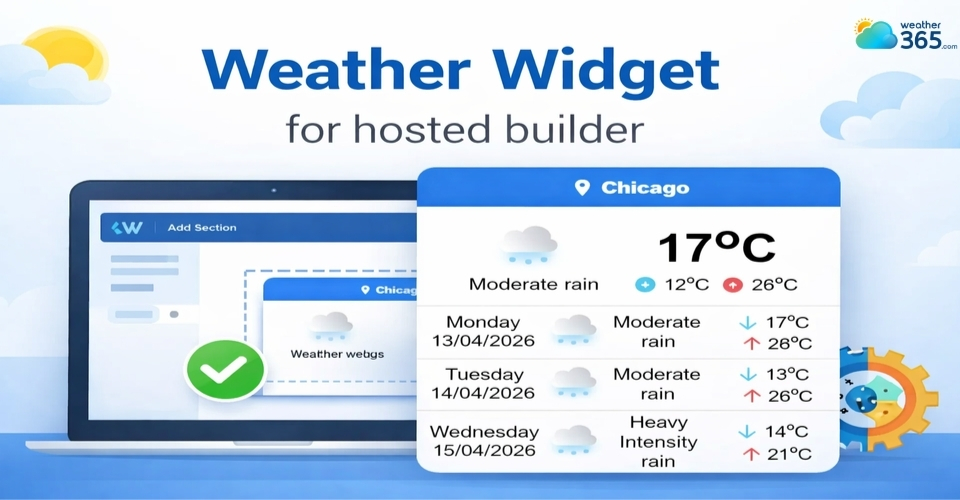
Weather widget for hosted builders
Choose a Weather Widget for Hosted Builders
The very first step is choosing the right weather widget provider.
Not all widgets are the same, so it’s important to pick one that balances performance, design, and ease of use.
A popular choice is the Weather365 widget, known for its clean interface and smooth integration with hosted builders.
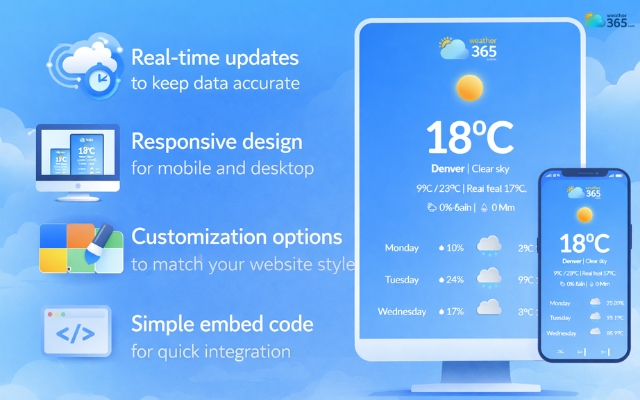
Unique features of Weather365 widget
With Weather365, you’ll enjoy these key features:
Real-time updates to keep data accurate
Responsive design for mobile and desktop
Customization options to match your website style
Simple embed code for quick integration
Many modern widgets, including Weather365, are lightweight and built specifically for hosted platforms, so they won’t slow down your site.
This is especially important since builders like Weebly or GoDaddy already manage hosting and performance behind the scenes.
Once you’ve selected a widget, you’re ready to tailor it to your needs.
Customize Your Weather Widget
Customization is where your weather widget truly becomes part of your website instead of just an add-on.
Most tools offer a wide range of settings that you can adjust before embedding.
With the Weather365 widget, you can customize
Location: Choose a city or allow automatic geolocation
Display model: Select between 2 models: compact, full forecast, or minimal style
Number of forecast days: Typically 3-7 days depending on your needs
Temperature and precipitation units: Celsius or Fahrenheit, mm or inches
Date format: Match your region (e.g., DD/MM or MM/DD)
Colors: Title, text, line, title background, and even border color can be changed.
Take a moment here to align the widget’s design with your website’s branding.
A well-matched widget feels natural and polished, while a mismatched one can look distracting.
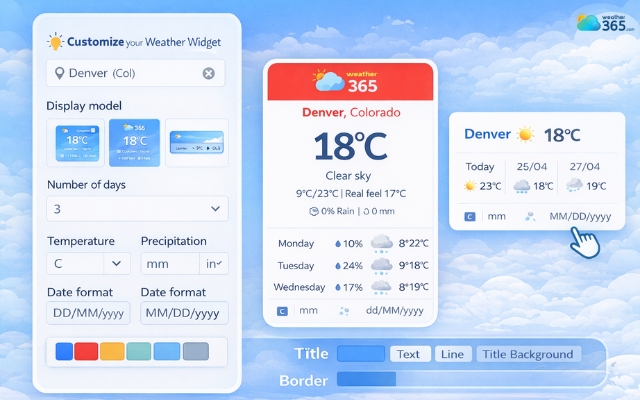
Freely customize the weather widget with Weather365
Create and Copy the Embed Code
Once you’ve finished customizing your widget, the next step is to copy the embed code.
Press the “Create widget” button, and the code will be generated automatically for you.
This is the piece of HTML that allows the weather widget to display on your website.
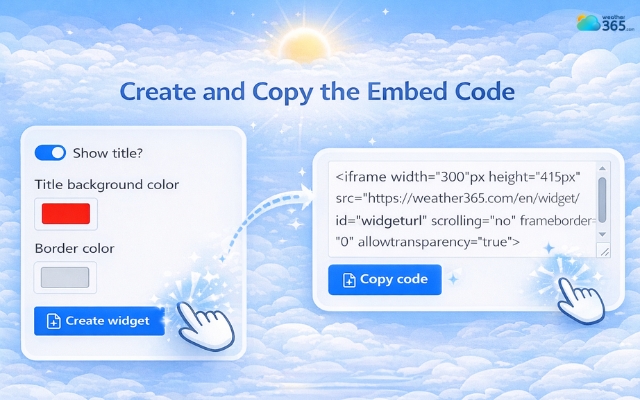
Weather365 automatically generates widget code
With tools like the Weather365 widget, adding weather widget for Lightweight Builders, hosted builder is usually quick and beginner-friendly.
Here’s what to keep in mind:
Make sure you copy the full embed code provided
Avoid editing the code unless necessary
Use the “Copy code” button to prevent errors
Most widgets generate a simple snippet using an iframe or script, which is fully compatible with hosted builders.
Getting this step right ensures your widget will display properly in the next stage without any issues.
Add an HTML Block and Paste the Code
Now it’s time to bring your widget into your website. Hosted builders typically offer a “Custom HTML” block or widget area.
Here’s how to do it:
Open your website editor (Weebly, GoDaddy, or Hostinger)
Drag and drop a Custom HTML block into your page
Paste the embed code you copied earlier
Save or apply the changes
That’s it - your weather widget should now appear on the page.
One advantage of hosted builders is how simple this process is.
You don’t need plugins or complex integrations, just paste the code and you’re done.

Paste the code into the block
Adjust Placement
Haven’t decided where to put the weather widget?
Here are a few smart placement ideas:
Header or hero section: Great for travel or location-based sites
Sidebar: Keeps it visible without taking too much space
Footer: Subtle and clean for general-purpose websites
Try to avoid cluttering your layout. If your page already has a lot of elements, a compact widget design works best.
Also, consider how the widget looks alongside other content. It should complement your page, not compete with it.
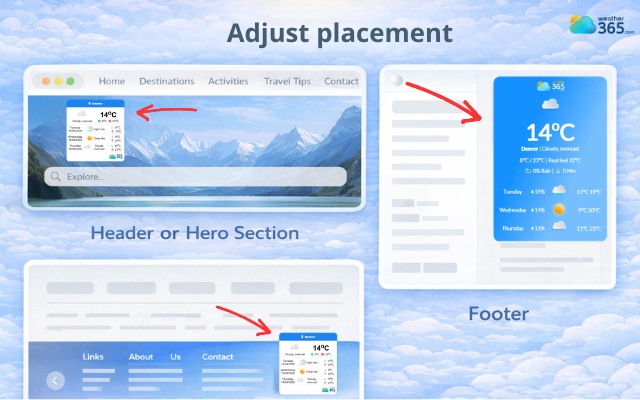
Place the weather widget in a suitable position
Preview and Publish
Before publishing, always preview your website on both desktop and mobile devices.
Check for:
Proper alignment and spacing
Readable text and colors
Smooth loading speed
Responsive layout on smaller screens
If everything looks good, go ahead and publish your site.
This final step ensures your Weather Widget for Hosted Builder works seamlessly for all visitors, regardless of the device they’re using.
The guide on how to add weather widget to any platform is also simple. Learn one and aplly for all.
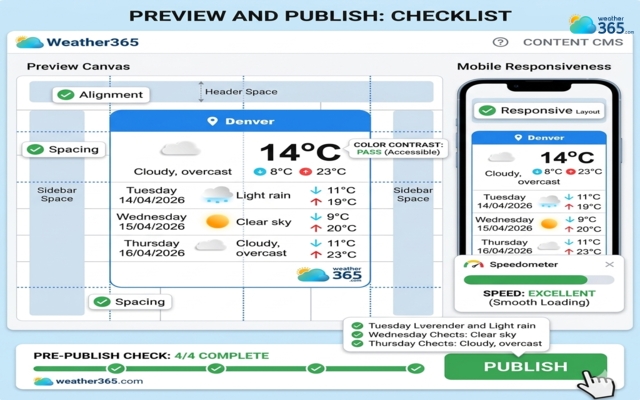
Carefully check the weather widget before publishing
Final Words
A Weather Widget for hosted builder is one of the easiest ways to make your site feel more alive. With just a few steps, you can add useful, real-time information without slowing things down. Keep it simple, place it well, and let it quietly improve your user experience.
Frequently Asked Questions (FAQs)
Still confusing? We have a full guide in weather widget for Wordpress!
Related post

How to Add Weather Widget to Any Platform? A Complete Guide for Beginners

Weather Widget for Lightweight Builders: Adding Live Weather Easily

0 Comment
Leave a comment
Your email address will not be published. Required fields are marked *