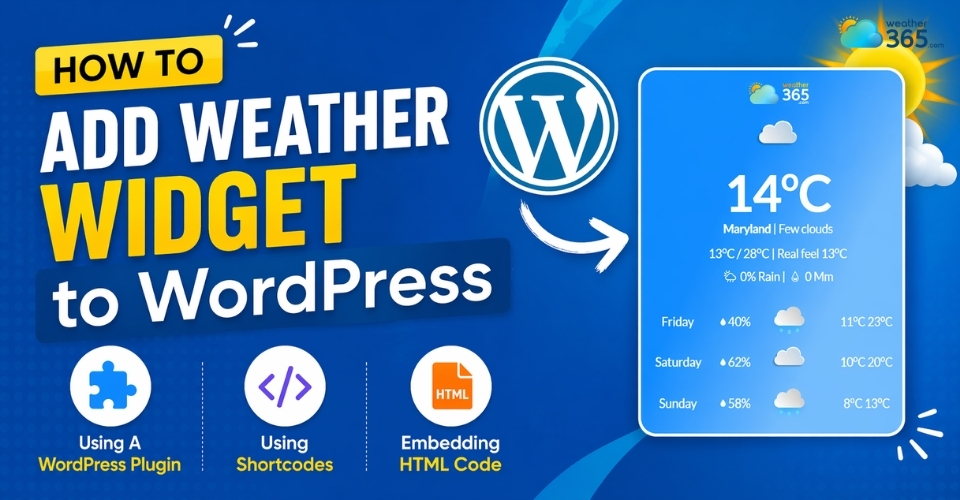
How To Add Weather Widget To WordPress Using Plugins or Embed Code
Are you looking for a guide on how to add weather widget to WordPress? Maybe you want to show real-time weather on your site but don’t know where to start. In fact, it’s much easier than you think. In this post, we’ll walk you through simple, beginner-friendly ways to add a weather widget, whether you prefer using plugins, shortcodes, or embedding HTML manually. Diving in!
How to add weather widget to WordPress
- How To Add Weather Widget to WordPress: Using A WordPress Plugin
- Best WordPress Weather Plugins
- Step-by-Step Installation
- How To Add Weather Widget to WordPress: Using Shortcodes
- What are Shortcodes?
- How to Deploy?
- Customization
- How To Add Weather Widget to WordPress: Embedding HTML Code
- When to Use Embedding HTML Code?
- The Custom HTML Block
- Sidebar & Footer Integration
How To Add Weather Widget to WordPress: Using A WordPress Plugin
If you want a quick, stress-free way to display weather on your website, using a WordPress plugin is hands down the easiest option.
You don’t need to touch any code, and most plugins are designed with beginners in mind, just install, tweak a few settings, and you’re good to go.
Instead of building everything from scratch, these plugins connect your website to reliable weather data sources and automatically display the information in a clean, user-friendly layout.
Best WordPress Weather Plugins
Before diving into the setup, here are a few trusted plugins you can start with:
Location Weather: A lightweight option that’s perfect if you just need a simple, clean weather display without extra features.
WP Weather Widget: Offers more flexibility in terms of layout and customization, suitable for blogs or business sites.
Weather Atlas Widget: Known for its modern design and more detailed weather data, great if you want something visually appealing.
Each of these plugins works slightly differently, but the setup process is generally very similar.
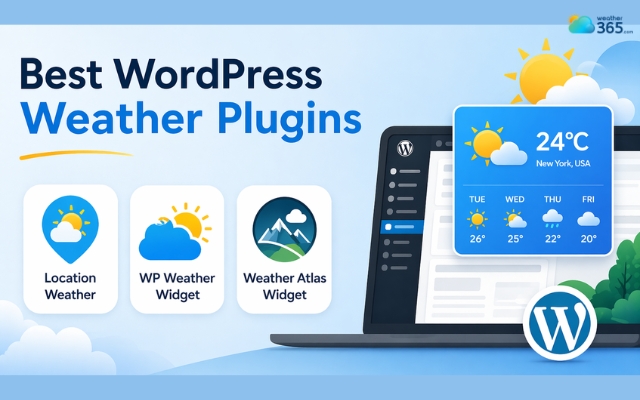
Trusted weather widget plugins for WordPress
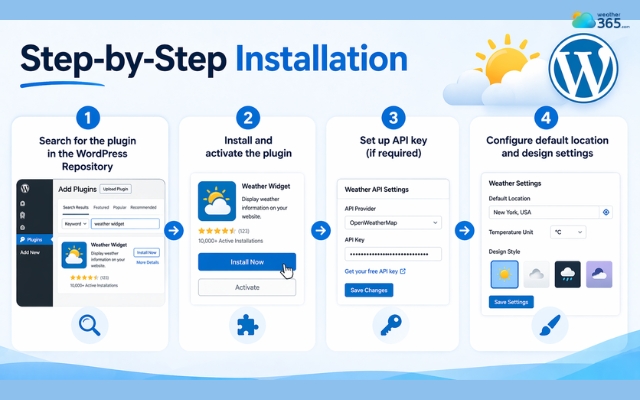
Step-by-Step Installation
Let’s walk through the process step by step so you can see how simple it actually is.
Search for the plugin in the WordPress Repository
Start from your WordPress dashboard:
Go to Plugins → Add New
In the search bar, type the plugin name (for example, “Location Weather”)
Browse the results and choose the plugin that fits your needs
Take a quick look at ratings and reviews—it helps you avoid outdated or poorly supported plugins.
Install and activate the plugin
Once you’ve found the plugin:
Click Install Now
After installation, hit Activate
At this point, the plugin is live on your website, but it still needs some configuration before it shows anything useful.
Set up API key (if required)
Some weather plugins rely on external services (like OpenWeather) to fetch real-time data. If that’s the case, you’ll need an API key.
Don’t worry! It sounds technical, but it’s usually straightforward:
Sign up on the weather provider’s website
Copy your API key
Paste it into the plugin settings in WordPress
Most plugins will guide you through this with clear instructions.
Configure default location and design settings
Now comes the fun part, customizing how your widget looks and behaves.
Typically, you’ll be able to:
Set a default location (e.g., Hanoi or any city your audience cares about)
Choose units (Celsius or Fahrenheit)
Adjust the layout (compact widget, full forecast, etc.)
Match colors and fonts with your website design
Some plugins even let you display multiple locations or add weather icons for a more visual touch.
Once you’re done, you can place the widget in your sidebar, footer, or even inside posts, depending on what the plugin supports.
This method is specific to WordPress, but the overall concept is similar across platforms.
If you want to explore more options, here’s a complete guide on how to add weather widget to a website.
Steps to add a weather widget plugin to WordPress
How To Add Weather Widget to WordPress: Using Shortcodes
If plugins feel a bit “set-and-forget” and you want more control over where your weather widget appears, shortcodes are a great option.
They give you flexibility without forcing you to write full HTML or deal with complex scripts.
What are Shortcodes?
Shortcodes are small pieces of text (usually wrapped in square brackets like [example]) that tell WordPress to display a specific feature or dynamic content.
Instead of manually embedding code, you just paste a shortcode, and WordPress handles the rest behind the scenes.
It’s especially useful for things like forms, galleries, and yes, weather widgets.
Shortcodes are small pieces of text
How to Deploy?
Using shortcodes is very straightforward. Once your plugin provides a shortcode, you can place it almost anywhere on your site.
Here are the most common ways to use it:
Inside a blog post or page
Just paste the shortcode directly into the content editor where you want the widget to appear.
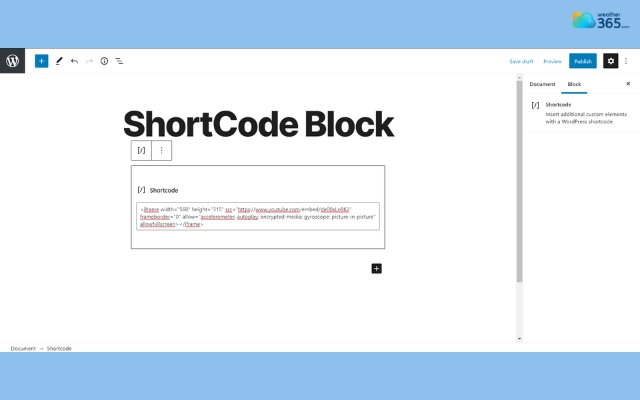
Using the Gutenberg “Shortcode” block
If you’re using the block editor:
Click the “+” button
Search for Shortcode
Paste your shortcode inside the block
In widgets (sidebar/footer)
Some themes allow shortcodes inside widget areas, so you can display weather globally across your site.
As soon as you publish or update the page, WordPress will automatically convert that shortcode into a working weather widget.
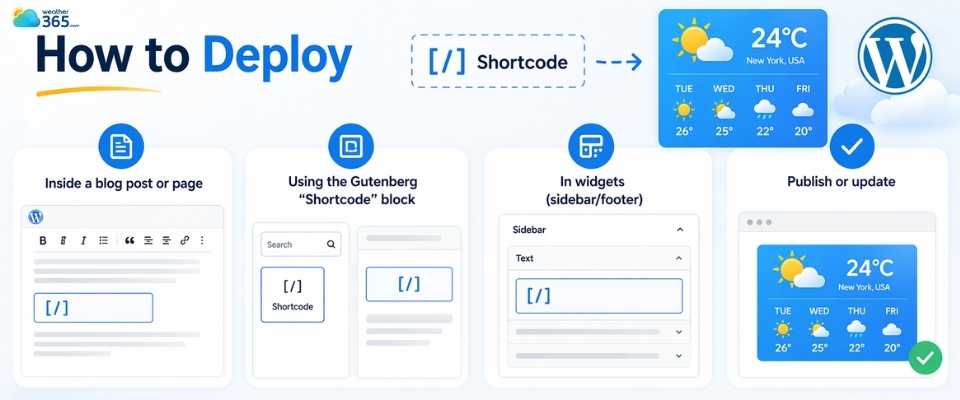
Place the shortcodes anywhere on your site
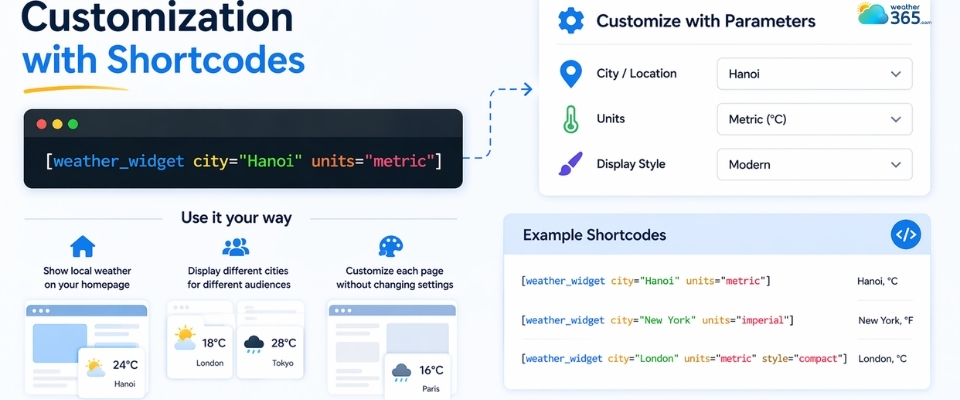
Customization
This is where shortcodes really shine. You’re not stuck with one default setting, you can tweak the widget directly inside the shortcode.
For example:
[weather_widget city="Hanoi" units="metric"]
With just a few parameters, you can control:
City/location – Show weather for different places on different pages
Units – Switch between Celsius and Fahrenheit
Display style – Some plugins support layout, language, or icon variations
This means you can do things like:
Show local weather on your homepage
Display different cities for different audience segments
Customize each page without touching plugin settings again
One small tip: always check the plugin’s documentation for supported parameters.
Each plugin may offer different customization options, and using the right ones helps you get the most out of your widget.
Customize the widget to match the site’s style
How To Add Weather Widget to WordPress: Embedding HTML Code
If you want full control over how your weather widget looks and works, embedding HTML code is the most flexible method.
It’s slightly more hands-on than using plugins or shortcodes, but it gives you the freedom to use custom designs, third-party widgets, or lightweight solutions without adding extra plugins to your site.
If you want a more detailed walkthrough, you can check our full guide on how to embed weather widget in HTML for step-by-step instructions.
When to Use Embedding HTML Code?
This method makes the most sense in a few specific situations:
You’re using a third-party provider like Weather365 that offers pre-built widgets
Since third-party widgets rely on external scripts, it’s also important to keep an eye on loading speed.
Here are some practical tips for weather widget performance optimization to keep your site running smoothly.
You want to avoid plugin overload (too many plugins can slow down your site)
You need a specific design or layout that plugins don’t support
You prefer a lightweight solution with minimal setup
In short, if you care about performance or design flexibility, HTML embedding is worth considering.
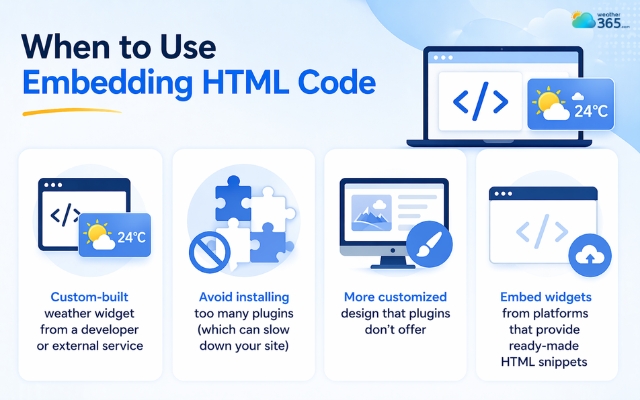
HTML embedding focuses on performance or design flexibility
The Custom HTML Block
WordPress makes it easy to add raw code through the Block Editor, so you don’t need to edit theme files or touch the backend.
Follow these steps:
Open the page or post where you want the weather widget
Click the “+” button to add a new block
Search for Custom HTML
Paste your embed code (from Weather365 widget or any provider)
Click Preview to see how it looks
Hit Publish or Update
Once added, WordPress will render the code exactly as intended.
This is especially useful if you’re embedding widgets from weather services that provide iframe or script-based code.
A quick tip: Always preview before publishing. Some widgets may need small adjustments (like width or alignment) to fit nicely into your layout.
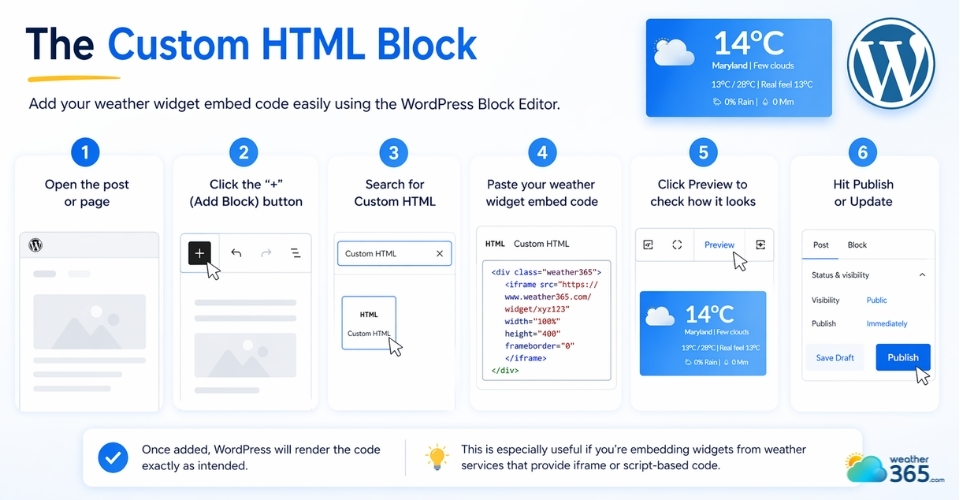
Open a page and paste the weather widget code
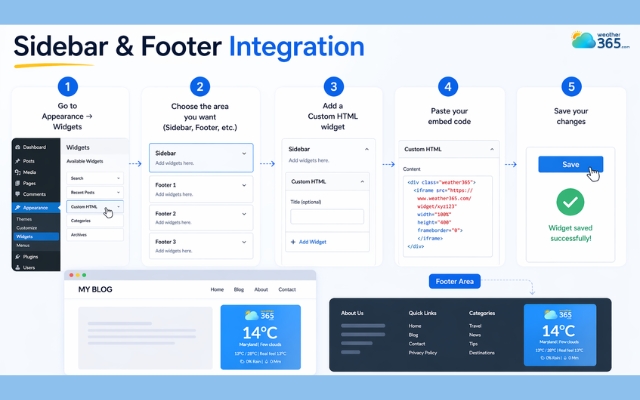
Sidebar & Footer Integration
If you want your weather widget to appear across your entire site, like in the sidebar or footer, you can add it using the widget area instead of individual pages.
Here’s how:
Go to Appearance → Widgets in your dashboard
Choose the area you want (Sidebar, Footer, etc.)
Add a Custom HTML widget
Paste your embed code
Save your changes
Now your weather widget will show up consistently on multiple pages, which is perfect for blogs, news sites, or travel websites where weather info is always relevant.
Using the widget area instead of individual pages
Sum up
Do you get stuck anywhere while trying to embed a weather widget in WordPress? If yes, do not hesitate to leave us a comment below. Hope now you can learn how to add a weather widget to WordPress successfully!
Frequently Asked Questions (FAQs)
Related post
")
How to Embed Weather Widget in HTML (No Coding Required)

Weather Widget Accessibility: Beginner Guide & Best Choice for Websites

0 Comment
Leave a comment
Your email address will not be published. Required fields are marked *