How To Add Weather Widget To Website: Simple Embed Guide for All Platforms
How to add weather widget to website without breaking your layout or slowing things down? If you’ve tried messy embed codes or widgets that refuse to display properly, you’re not alone. In this guide, you’ll learn a simple, reliable way to add and customize a weather widget quickly. Diving in!

How to add weather widget to website
- How to Add Weather Widget to Website
- Key benefits
- Add a weather widget to the website
- Add Weather Widget on Different Website Platforms
- Add Weather Widget to HTML Website
- Add Weather Widget to WordPress
- Add Weather Widget to Notion
- Common Issues When Adding Weather Widget (And Fixes)
- Tips for adding weather widgets
How to Add Weather Widget to Website
If you’ve ever tried embedding a weather widget and ended up with broken layouts or scripts that don’t load, you know it’s not always as “plug-and-play” as it sounds.
Don’t worry! Once you understand the logic behind it, the process becomes surprisingly simple, and much easier to control.
Key benefits
Believe it or not, adding a weather widget actually improves how useful and engaging your website feels.
For visitors, having real-time weather data right on the page saves time and creates a more complete experience, especially if your content is location-based (travel, events, local business, etc.).
From a website owner’s perspective, a well-placed widget can keep users on your page longer.
Instead of leaving to check the weather elsewhere, they stay, and that small detail can positively impact engagement metrics.
There are also two important aspects many people overlook: weather widget GDPR compliance and weather widget accessibility.
If your site targets users in regions like Europe, you need to ensure the widget provider handles data responsibly (cookies, IP tracking, etc.). Choosing a compliant provider helps you avoid legal issues.
At the same time, accessibility matters more than ever.
Clear contrast, scalable text, and mobile-friendly layouts make a big difference in how inclusive your site feels.
You may also like:

Benefits of getting a weather widget
Add a weather widget to the website
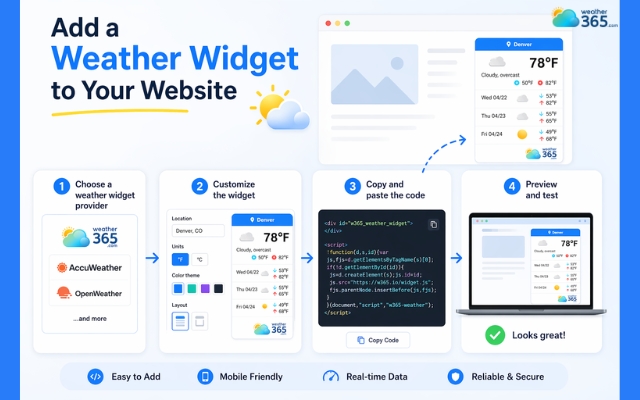
Adding a weather widget follows a simple flow: choose → customize → embed → adjust.
But each step plays an important role in how the final result looks and performs.
Choose a weather widget provider
First, you’ll need to pick a weather widget provider. Some focus on minimal design and speed, while others offer more advanced customization.
Don’t just go for the fanciest option, choose one that matches your website’s style and performance needs.
Customize the widget
Once you’ve selected a provider, the next step is customization. This is where you decide what your visitors will actually see: location, temperature units, forecast range, colors, and layout.
It’s worth taking a few extra minutes here so the widget blends naturally with your site instead of looking like a pasted element.
Copy and paste the code
After that, you’ll get an embed code (usually a small snippet of HTML, JavaScript, or an iframe). This is what connects your website to the weather data.
You simply copy this code and paste it into your website where you want the widget to appear.
Where you place it matters more than you might think. A sidebar, footer, or homepage section often works best.
Placing it too prominently can distract users, while hiding it too deep makes it useless.
After you paste the embed code into your website, you can preview how it looks and make small adjustments.
If you need a more detailed walkthrough or run into issues along the way, you can check out our Weather Widget Tutorials for a deeper step-by-step guide.
Preview and test
Finally, always preview and test. Check how the widget looks on both desktop and mobile, and make sure it loads quickly.
If something feels off: spacing, size, or speed, adjust it before publishing.
Once you go through this process once, adding a weather widget becomes quick and repeatable.
And more importantly, you’ll know how to make it actually fit your site, not just exist on it.
Simple steps to get a weather widget
Add Weather Widget on Different Website Platforms
How to adapt this method to the platform you’re actually using?
Because each platform handles code, layout, and customization slightly differently, this is where things can feel a bit confusing.
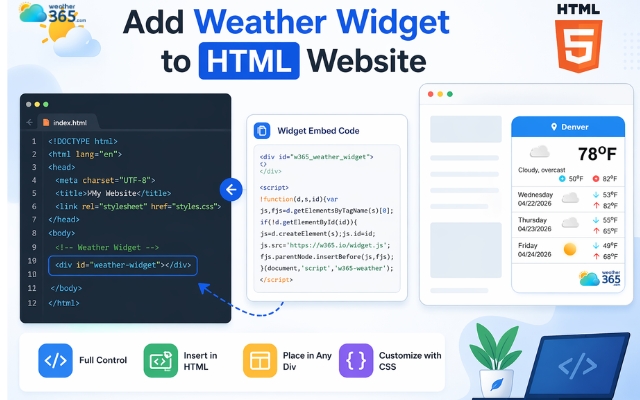
Add Weather Widget to HTML Website
If you’re working with a plain HTML website, you have the most control, but also the most responsibility.
There’s no drag-and-drop interface here, so everything depends on where and how to embed weather widget in HTML.
After copying the widget embed code, you’ll paste it directly into your HTML file.
Most of the time, placing it inside the "body" section is enough, but the exact position matters.
For example, adding it inside a specific "div" allows you to control spacing and alignment more precisely.
You may also need to tweak a bit of CSS to make the widget blend in with your design.
Without that, it can look like a foreign element sitting awkwardly on your page.
The advantage, though, is flexibility: you can fully control layout, responsiveness, and performance if you know what you’re doing.
Place the code into your HTML file
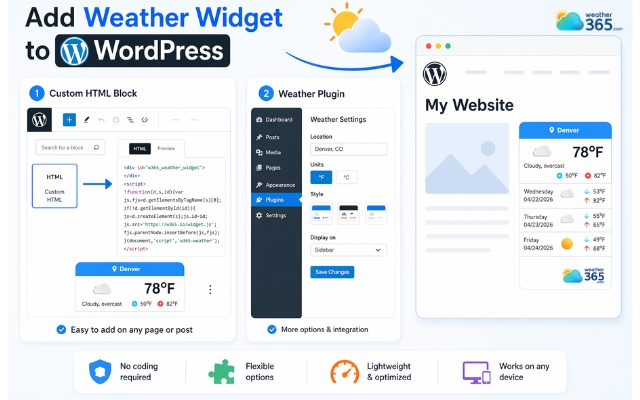
Add Weather Widget to WordPress
How to add weather widget to WordPress? It's not too complicated.
With WordPress, things become much more user-friendly. You don’t need to touch raw code unless you want to.
The simplest way is using a Custom HTML block inside the block editor.
You just paste the widget code there, preview it, and adjust placement as needed. This works well if you only need the widget on a specific page or post.
If you want something more integrated, plugins are another option.
Many weather plugins come with built-in settings for location, style, and display, so you don’t have to rely on external embed codes.
Plugins can sometimes add extra weight to your site, so it’s worth choosing one that’s lightweight and well-maintained.
In short, WordPress gives you convenience, but you still need to balance ease of use with performance.
Paste the widget code in a Custom HTML block
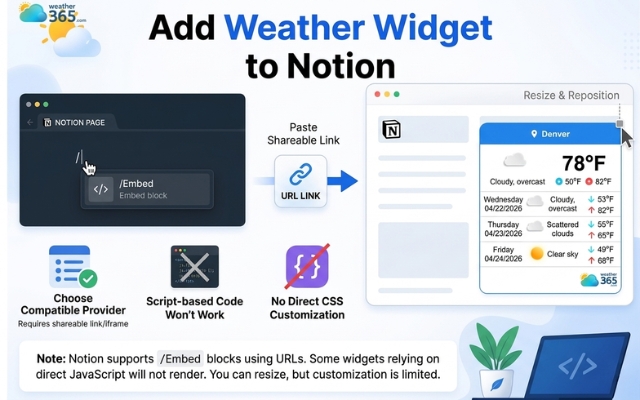
Add Weather Widget to Notion
Notion works a bit differently because it’s not a traditional website builder, it’s more of a content workspace. That means embedding options are more limited, but still doable.
Most weather widgets can be added using Notion’s embed block, where you paste a widget URL instead of raw code.
However, not all providers support this format. Some widgets rely on scripts that Notion simply won’t render.
Because of that, the key here is choosing the right provider: one that offers a shareable link or iframe-compatible version.
Once it’s embedded, you can resize and position it within your page, but customization is more restricted compared to HTML or WordPress.
So while Notion isn’t the most flexible platform for widgets, it still works well for simple, clean weather displays, especially in dashboards or personal pages.
Add a weather widget using Notion’s embed block
Common Issues When Adding Weather Widget (And Fixes)
Even though adding a weather widget sounds simple, things don’t always go as expected.
Most issues come from small technical details rather than anything too complex. Once you know what to look for, they’re usually quick to fix.
Here are the most common problems you might run into:
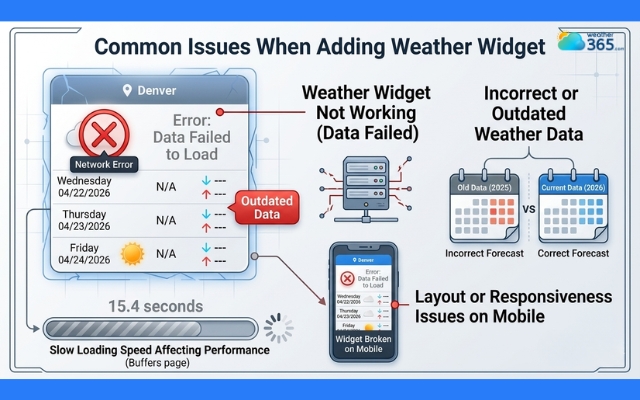
Weather widget not working
One of the biggest frustrations is when the weather widget not working at all.
This often happens because the embed code is placed incorrectly or the platform you’re using doesn’t support certain scripts.
For example, some website builders restrict JavaScript, which can prevent the widget from loading.
Incorrect or outdated weather data
Another issue is inaccurate data. If the widget shows the wrong location or doesn’t update, it’s usually due to incorrect settings or limitations from the provider.
A quick check of location, timezone, and refresh options can often fix this.
Slow loading speed affecting performance
Performance is something many people overlook at first. Some widgets load extra scripts that can slow down your site, especially on mobile.
That’s why weather widget performance optimization matters.
Choosing a lightweight widget, avoiding unnecessary features, and placing it in a less critical area (like footer o r sidebar) can help keep your site fast.
Layout or responsiveness issues on mobile
Layout problems are also quite common. A widget might look fine on desktop but break on smaller screens or disrupt your design.
In most cases, adjusting the container size or checking responsive settings is enough to fix it.
Avoid common mistakes when adding a weather widget
Tips for adding weather widgets
So you’ve added the widget - great job!
But before you move on, it’s worth checking if it really fits your site or just sits there looking out of place.
Here are a few practical tips to help you get it right:
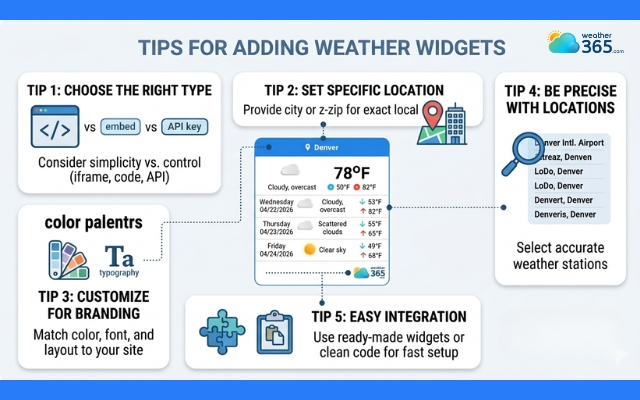
Choose the right type: Select a layout that fits your page, such as a compact current temperature, an hourly, or a detailed forecast.
Customize for branding: Use providers that allow customization of colors, fonts, and background images to maintain site consistency.
Set specific location: If your website serves a specific area (like a hotel), set the location directly in the widget settings. If it’s for general users, use a tool with automatic location detection
Easy integration: Most platforms (WordPress, Wix, Webflow) allow you to add the widget by pasting a simple script into a “Custom HTML” or “Embed” block.
Be precise with locations: If a widget allows location search, ensure it supports specific city + state formatting to avoid displaying wrong location.
Practical tips when adding a weather widget
Final thought
In short, adding a weather widget to your website is very simple if you follow the steps correctly. Just choose the right widget, customize it appropriately, and place it in the right location, and you can instantly enhance the user experience.
Frequently Asked Questions (FAQs)
Related post
")
How to Embed Weather Widget in HTML (No Coding Required)

Weather Widget Accessibility: Beginner Guide & Best Choice for Websites

Weather Widget Performance Optimization Tips for Faster Websites

0 Comment
Leave a comment
Your email address will not be published. Required fields are marked *