Weather Widget Tutorials: Complete Guide to Fix Common Integration Issues
How many issues have you run into while trying to add a weather widget: code not showing, wrong location, or it just refuses to load properly? You’re not alone. Setting up a widget can feel simple at first, but small details often cause unexpected problems. In this guide, we’ll walk through weather widget tutorials step by step, so you can set it up, customize it, and fix common issues without the frustration.
Weather widget tutorials
- Why Add a Weather Widget?
- Website Widget Tutorials: How to Add One To Your Site
- Choose a reliable widget provider
- Customize Your Widget
- Generate and Copy the Embed Code
- Add the Widget to Your Website
- Preview and Adjust Placement
- Step 6: Publish and Monitor Performance
- Custom Styling and Advanced Weather Widget Tutorials
- Troubleshooting: Weather Widget not Working
- Top-Rated Weather Widget for Website
- Weather365 (Best free option)
- Elfsight
- WeatherWidget.io
- Location Weather Widget (Best for geo-based experience)
- Meteoblue
Why Add a Weather Widget?
A weather widget can play a much bigger role in how users interact with your website, how relevant your content feels, and even how search engines evaluate your page.
Enhance user engagement
One of the biggest benefits is user engagement. Weather is something people check every day, often without thinking.
If visitors can quickly see the current conditions without leaving your site, they’re more likely to stay longer and continue exploring.
It’s a simple addition, but it creates a smoother, more helpful experience.
Niche value (industries benefit from hyper-local data)
The value becomes even clearer in certain industries.
For travel websites, real-time weather helps users plan instantly. For eCommerce, especially in fashion or outdoor gear, weather can directly influence what people choose to buy.
Local businesses, event pages, or even blogs can also benefit from hyper-local data, making content feel more timely and personalized rather than static.
SEO benefits
From an SEO perspective, a weather widget supports your site in subtle but important ways.
It adds a layer of dynamic content, improves user experience, and can increase time spent on page, all signals that search engines pay attention to. That said, it’s important to use a lightweight widget so it doesn’t slow down your site.
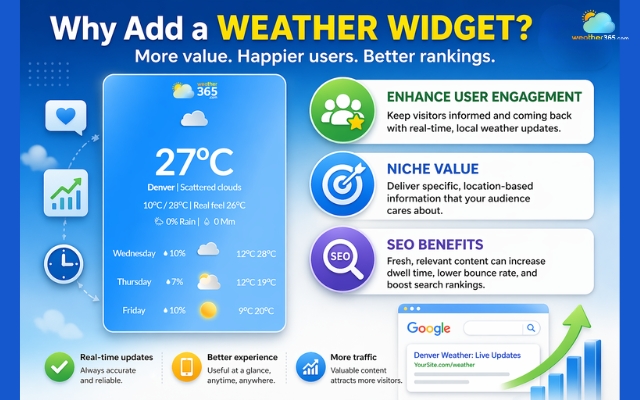
Benefits of having a weather widget on the site
Website Widget Tutorials: How to Add One To Your Site
Most modern weather widget tools, like Weather365, are built for non-technical users, so the whole process mainly involves choosing settings and copying a small piece of code.
If you follow the steps below, you can get a fully working widget in just a few minutes.
Choose a reliable widget provider
Everything starts with selecting a right weather widget provider. This is the platform that supplies both the weather data and the visual design.
A good provider should be easy to use and allow basic customization like location, forecast range, and layout.
For example, with Weather365, you can simply enter a city, adjust how the widget looks, and instantly see a preview.
This makes it much easier to understand what you’re adding to your site instead of working blindly.
At this stage, focus on simplicity and reliability. A clean, fast-loading widget is always better than something overly complex.
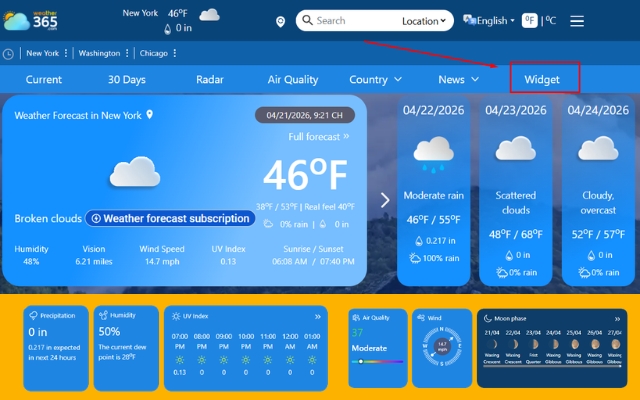
Choose a reliable widget from Weather365
Customize Your Widget
Once you’ve picked a provider, the next step is to adjust the widget so it fits your website.
This is where you decide what users will actually see. You can choose the location you want to display, how many days of forecast to show, and whether the temperature appears in Celsius or Fahrenheit.
Most tools also let you tweak colors, layout, and size so the widget matches your website’s overall style.
It’s worth spending a little extra time here. A well-customized widget feels like part of your site, while a default one can look out of place.
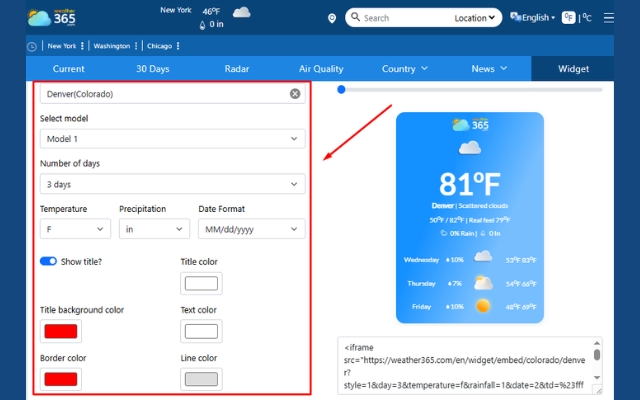
Adjust the widget to fit your site
Generate and Copy the Embed Code
After finishing the setup, click “Create widget”, and the platform will generate an embed code.
This is usually a short HTML snippet that connects your website to the weather data.
You don’t need to understand the code itself. Just click the generate button and copy the code provided.
This step is intentionally simple because most widget providers are designed for quick integration.
Think of it as a bridge, the code pulls live weather data into your website automatically.
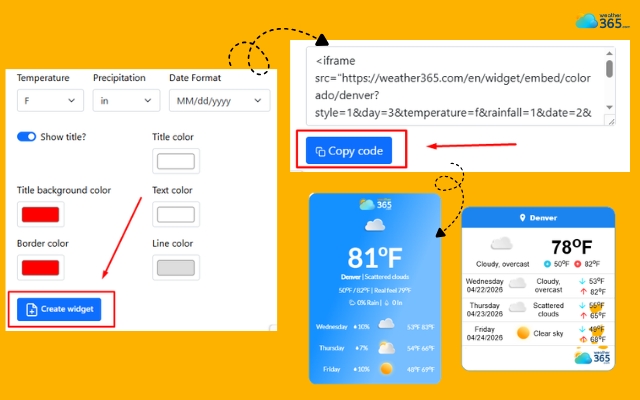
Get the code by clicking “Create widget”
Add the Widget to Your Website
Now it’s time to place the widget on your site!
Depending on what platform you’re using, you’ll paste the code into a custom HTML section, a page builder block, or a widget area.
Most website builders like WordPress or Shopify make this very straightforward, you just paste the code and save.
As soon as you do that, the widget should appear on your page without any extra setup.
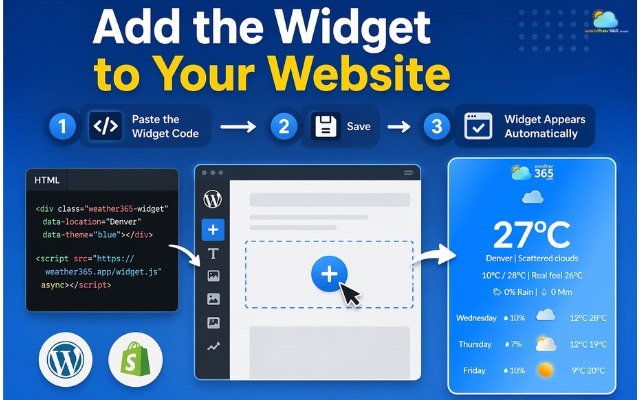
Paste the code into a custom HTML section
Preview and Adjust Placement
After embedding the widget, always take a moment to preview your page.
Look at how it fits within your layout. Does it feel natural, or does it look squeezed into the wrong place?
Check both desktop and mobile views to make sure everything is readable and balanced.
If something doesn’t look right, you can go back, adjust the settings, and update the code.
This back-and-forth is completely normal and helps you get a polished result.
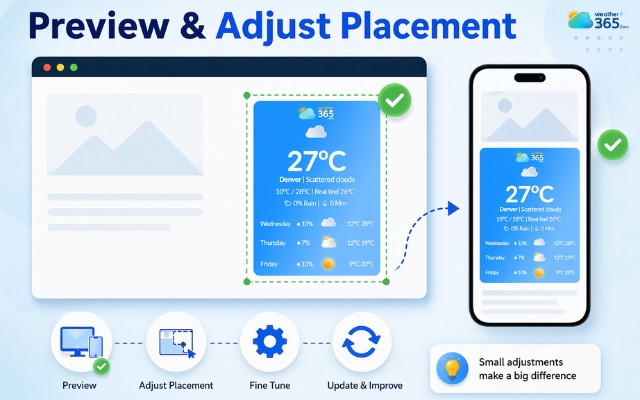
Take a moment to preview your weather widget
Step 6: Publish and Monitor Performance
Once everything looks good, you can publish your page. But the process doesn’t completely end there.
It’s a good idea to monitor how the widget performs over time. Make sure it loads quickly, displays accurate data, and doesn’t affect your site speed.
If you notice any issues, you can always switch to a lighter version or tweak the configuration.
Can’t add a weather widget to your site? We have a more detailed guide on how to add weather widget to website. Read here!

Publish the widget once you are happy with it
Custom Styling and Advanced Weather Widget Tutorials
Once your weather widget is up and running, the next step is making it truly fit your website.
A default widget might work functionally, but if it doesn’t match your design or user needs, it can feel disconnected.
Adjust the location and displayed data
Start with the basics: adjusting location and displayed data. Tools like Weather365 let you control whether the widget shows a fixed city or adapts to the user’s location.
You should also decide how much information to display. A simple site may only need current conditions, while travel or event pages benefit from a multi-day forecast.
The goal is to keep it useful without overwhelming the user.
Customize colors and visual style
This is where many websites miss an easy win. Changing colors, background, and typography helps the widget blend naturally with your brand.
If it looks like a separate element, users will notice. If it matches your design, it feels like part of the experience.
Control layout and size
Layout and size also matter more than expected. A widget placed in the wrong spot can interrupt the reading flow.
A compact version works well in sidebars, while wider layouts fit better in main content sections.
Always check how it appears on both desktop and mobile to avoid spacing or readability issues.
Set units and formatting
Don’t forget units and formatting. Showing the wrong temperature unit or an unfamiliar time format can create small but frustrating friction.
Matching your audience’s expectations makes the widget easier to use instantly.
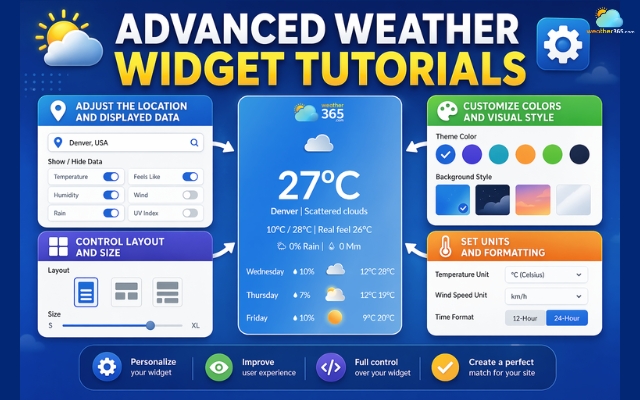
Customize the widget to get the best result
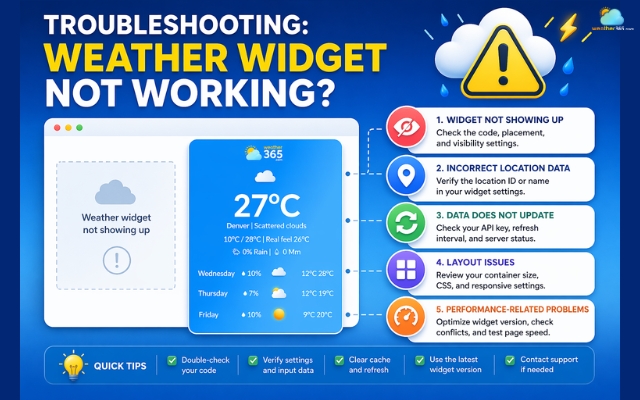
Troubleshooting: Weather Widget not Working
Even when you follow all the setup steps, a weather widget can sometimes fail to display or behave incorrectly.
The good news is that most issues are quite common and usually easy to fix once you know where to look.
Weather widget not showing up
One of the most frequent problems is the widget simply not showing up.
This often happens when the embed code is placed in the wrong section of your website or gets altered during copy-paste.
If you’re using a platform like WordPress or Shopify, make sure you’re adding the code inside a proper HTML block, not a visual editor that might strip parts of it.
Incorrect location data
Another common issue is incorrect or missing location data.
If your widget is showing the wrong city, or nothing at all, it’s usually related to how the location is configured.
With tools like Weather365, double-check whether you’ve selected a fixed location or enabled auto-detection.
Sometimes, browser location permissions can also affect what users see.
Common mistakes when adding a weather widget
Data does not update
You might also notice that the data doesn’t update in real time. In many cases, this is caused by caching.
Your browser or website cache may store an old version of the widget, making it seem like the weather is stuck.
Clearing the cache or refreshing the script usually solves this quickly.
Layout issues
Then there are styling and layout issues. If the widget looks broken: misaligned text, wrong colors, or overlapping elements, it’s often due to CSS conflicts with your existing website design.
Small adjustments in spacing or container size can fix this without needing to change the widget itself.
Performance-related problems
Finally, keep an eye on performance-related problems.
If the widget loads too slowly, it may be blocked by other scripts or affected by page speed optimizations.
In that case, switching to a lighter version or enabling lazy loading can help.
Top-Rated Weather Widget for Website
Choosing the right weather widget can save you a lot of time later.
Some tools focus on simplicity, others on design flexibility, and a few go deeper with advanced data visualization.
Weather365 (Best free option)
If you want something quick, clean, and easy to control, Weather365 is a strong choice.
You can generate a widget in just a few steps: select location, adjust colors, choose forecast range, and copy the code.
What makes it stand out is how balanced it is. You get enough customization (colors, layout, data fields) without feeling overwhelmed.
It’s especially suitable for blogs, small business sites, or anyone who wants a lightweight solution that still looks polished.
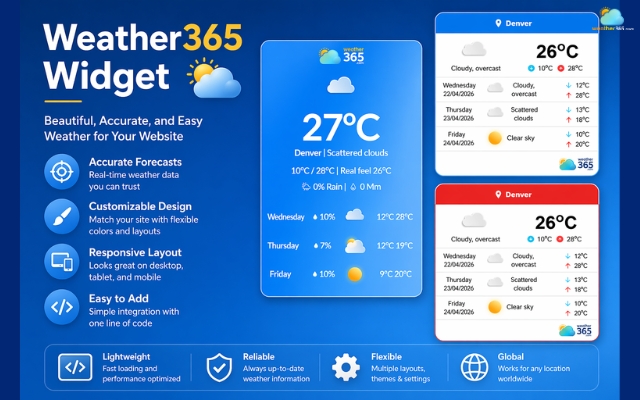
Weather365 is the most reliable choice
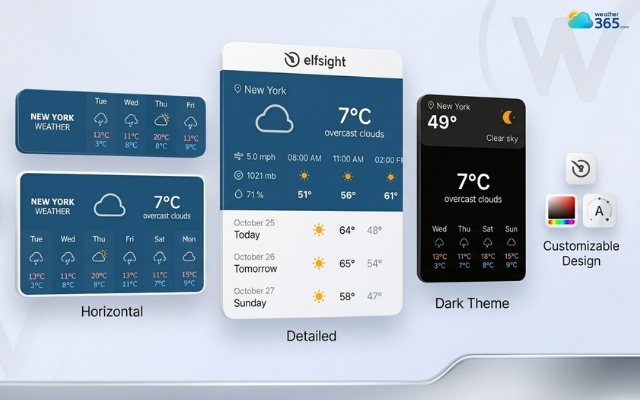
Elfsight
Elfsight is more like a full-featured plugin than a simple widget.
It offers detailed weather data such as temperature, humidity, pressure, and even hourly or weekly forecasts.
It also comes with a visual editor, meaning you can customize everything without touching code.
This makes it ideal for businesses or larger websites that want more control and advanced features.
The trade-off is that it can feel heavier compared to simpler tools.
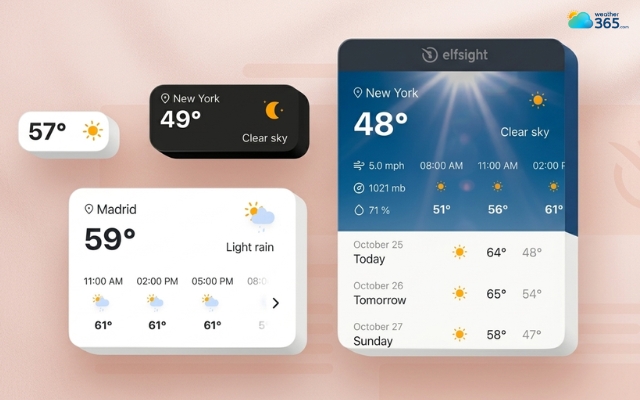
Elfsight offers simple weather widget layouts
WeatherWidget.io
If you’re looking for a completely free and straightforward solution, WeatherWidget.io is a popular pick.
You can customize fonts, colors, forecast days, and layout, then just copy and paste the code into your site.
It’s very beginner-friendly and works on almost any website.
However, it requires you to set a fixed location manually, which may be limiting if you want dynamic or auto-detected weather.
WeatherWidget.io requires you to set a fixed location manually
Location Weather Widget (Best for geo-based experience)
Location-based widgets focus on automatically showing the weather based on the user’s position.
This makes your content feel more personalized, especially for local services or travel sites.
The advantage is relevance: users instantly see the weather for where they are.
But it depends on browser permissions, so it’s not always 100% reliable if users block location access.
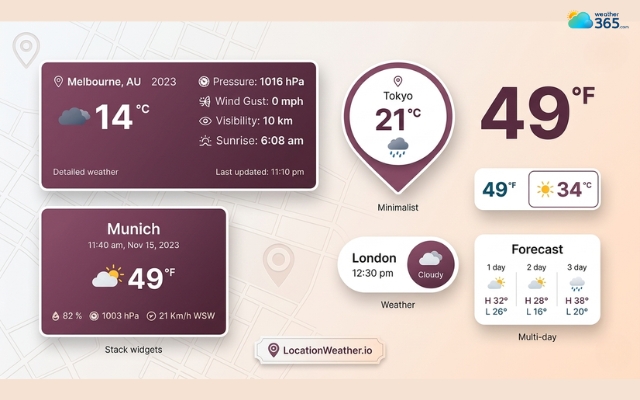
Location weather focuses on automatically showing the weather
Meteoblue
If you need more than just basic forecasts, Meteoblue is a strong option.
It provides highly detailed weather data, including temperature, precipitation, wind, and even advanced insights like climate patterns and forecast models.
What makes Meteoblue different is its focus on accuracy and depth.
It’s especially useful for websites related to the environment, travel planning, or any content that depends on reliable weather information.
The interface is still quite clean, but compared to simpler widgets, it may feel a bit more data-heavy.
In short, Meteoblue is a great choice if you want a more professional, data-driven weather widget rather than just a basic display.
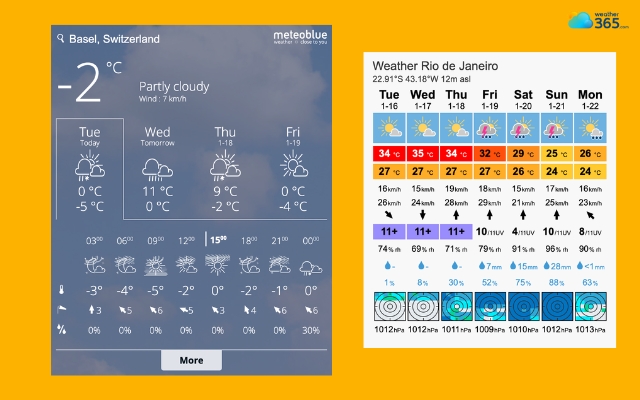
Meteoblue provides a professional weather widget
Tips to Choose the Right Weather Widget
Match it with your website’s purpose
Prioritize ease of use
Look for customization options
Check performance and loading speed
Consider location flexibility
Evaluate data accuracy and update frequency
Ensure mobile responsiveness
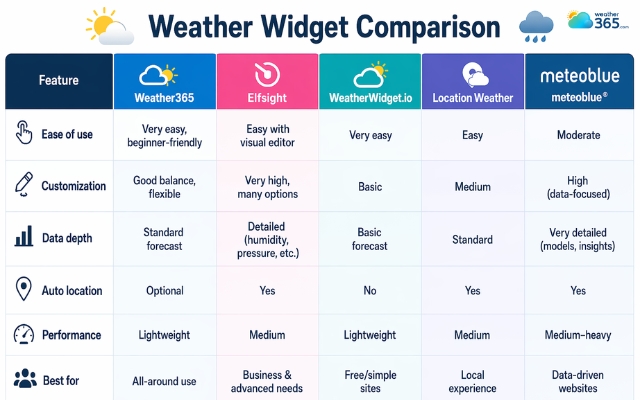
Weather widget comparison
Wrap up
How many issues have you run into while trying to add a weather widget? Have you managed to fix them yet? If not, feel free to drop a comment below and we can figure it out together. Hope these Weather Widget Tutorials make things a bit easier for you. With the right tool and a few simple tweaks, you can have a clean, useful widget that actually fits your website.
Frequently Asked Questions (FAQs)
Related post

Weather Widget Not Working? Common Issues & How to Fix Them

Best Weather Widget for Website: Weather365 vs Top Alternatives

0 Comment
Leave a comment
Your email address will not be published. Required fields are marked *